3D Technologies on the Web
Web Graphics Library is a Javascript API for implementing 2D and 3D graphics in the browser. It is a hardware-accelerated technology, meaning it leverages the computational power of the machine, especially the graphics card or GPU, used to implement interactive 3D websites or video games in the browser using the "Canvas" tag.
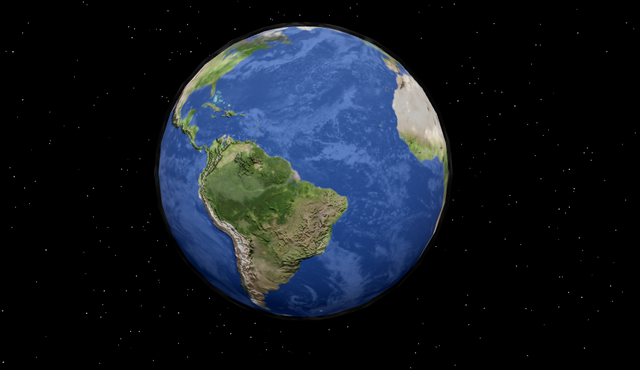
Examples of WebGL usage can be seen in Google Maps or Google Earth, or for data visualization. It can also be commonly found on brand pages to showcase their products like cars or mobile devices, or even in Unity to create more interactive 3D experiences on the Web.
Easing WebGL Implementation: Three.js and React Three Fiber
Libraries such as Three.js and React Three Fiber facilitate the implementation of WebGL by providing high-level abstractions and React components to create and display 2D and 3D graphics in the browser in a more modular and easy-to-understand manner.

| Porsche in React Three Fiber |
Three.js is an open-source library that can be used across multiple web browsers and is written in Javascript, making it accessible to developers using any Javascript library or framework. React Three Fiber, on the other hand, is a library based on Three.js and provides React components to render 2D and 3D graphics in a more modular and simple manner.
Graphics Optimization and Performance in WebGL
It is important to note that working with WebGL can be demanding in terms of hardware resources, so it is important to optimize graphics and performance to ensure a smooth and efficient experience in the browser.
Practical Applications of WebGL
WebGL is also used to display 3D apartments dynamically, providing a more attractive and interactive experience for potential customers. With WebGL, users can view a 3D apartment, rotate the camera to see the space from different angles, and even virtually walk through the space.
360-degree product views can be a powerful tool for e-commerce websites, as they allow customers to get a better idea of the product's design and functionality. They can also help customers make more informed purchase decisions by providing a more detailed view of the product.
Design the next Iphone / neal.fun
Creating 3D scenes with Three.js and React Three Fiber: Step-by-step tutorial
In recent years, there has been an increase in the popularity of creating 3D animations in the browser. One of the most popular tools to achieve this is React Three Fiber, which provides a set of React components to build 3D scenes using Three.js. In this section, we will learn how to create a simple 3D scene that includes the sun, the earth, and some stars.
Creating a Vite Project with React
npm create vite@latest earth-sun-system
We install the necessary dependencies
npm i @react-three/fiber @react-three/drei @react-three/postprocessing three
In the main.jsx component, we import the Canvas component from @react-three/fiber and instantiate it around App
import React from 'react';
import ReactDOM from 'react-dom/client';
import App from './App';
import { Canvas } from '@react-three/fiber';
ReactDOM.createRoot(document.getElementById('root')).render(
  <React.StrictMode>
    <Canvas>
      <App />
    </Canvas>
  </React.StrictMode>
);
From the App component, we create a Mesh component around a spherical geometry with a basic material.
The mesh can be seen as the composition of a skeleton and its skin, the spherical geometry being the skeleton and the basic material with the prop of red value as its skin.
import React from 'react';
import './App.css';
const App = () => {
  return (
    <>
      <mesh>
        <sphereGeometry />
        <meshBasicMaterial color='red' />
      </mesh>
    </>
  );
};
export default App;
This is enough to generate something on the screen, but before that, in the App.css we are going to set styles so that our canvas occupies the whole screen. Remember to import it into App.jsx
* {
  box-sizing: border-box;
}
html,
body,
#root {
  width: 100%;
  height: 100%;
  margin: 0;
  padding: 0;
}
We execute
npm run dev

We can see a static canvas with a red sphere in 3D on the screen, although we still won't be able to orbit the camera.
Now we can import the textures we will use, @react-three/drei allows us to import textures easily.
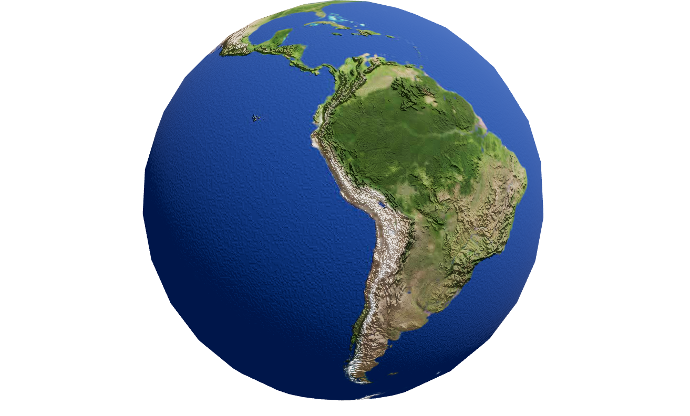
We import the library and the textures, keep in mind that the direction of the textures is public/textures/..., the hook useTexture already determines the public path by default, once imported, we will change the material of our mesh from meshBasicMaterial to meshStandardMaterial and assign the daymap texture through the map prop, this material supports the textures we will use, everything is as follows.
The images can be found in the Repository
import { useTexture } from '@react-three/drei';
import React from 'react';
import './App.css';
const App = () => {
  const [daymap, cloudMap, bump] = useTexture([
    'textures/daymap.jpg',
    'textures/cloudmap.jpg',
    'textures/elevation.jpg',
  ]);
  return (
    <>
      <mesh>
        <sphereGeometry />
        <meshStandardMaterial map={daymap} />
      </mesh>
    </>
  );
};
export default App;
Now we see a dark sphere on the screen. This is because the meshStandardMaterial is affected by light, and there is no light in the scene yet.
Let's create an ambient light with an intensity of 0.5 under the mesh.
Also, we'll import and add the OrbitControls component to move our scene with the cursor.
import { OrbitControls, useTexture } from '@react-three/drei';
import React from 'react';
import './App.css';
const App = () => {
  const [daymap, cloudMap, bump] = useTexture([
    'textures/daymap.jpg',
    'textures/cloudmap.jpg',
    'textures/elevation.jpg',
  ]);
  return (
    <>
      <mesh>
        <sphereGeometry />
        <meshStandardMaterial map={daymap} />
      </mesh>
      <ambientLight intensity={0.5} />
      <OrbitControls />
    </>
  );
};
export default App;
Things are beginning to take shape.

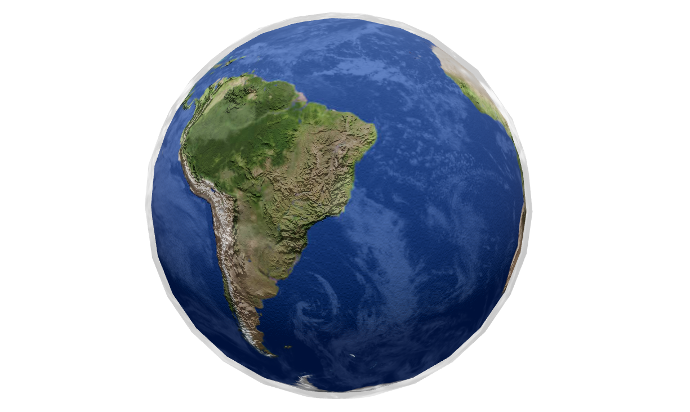
Next, we add the texture of relief to the meshStandardMaterial and a relief scale.
//...
<mesh>
  <sphereGeometry />
  <meshStandardMaterial map={daymap} bumpMap={bump} bumpScale={0.7} />
</mesh>
//...
If you noticed, it hasn't made any difference. This is because this texture is reactive to light, but the ambient light is not enough to activate the effect, so we need to add a light with direction, such as pointLight.
//...
      <mesh>
        <sphereGeometry />
        <meshStandardMaterial map={daymap} bumpMap={bump} bumpScale={0.7} />
      </mesh>
      <ambientLight intensity={0.5} />
      <pointLight intensity={2} position={[5, 5, 5]} />
//...
Now we can see that it looks much more detailed and illuminated not uniformly since the pointLight arrives from a specific direction, like the sun.
For the implementation of the clouds, we won't do it directly on the Earth but we'll create a new Tierra with the texture map of the clouds and with a defined transparency and opacity. Plus, with a slightly larger radius than the earth, but with the same center, to create the illusion correctly.
//..
      <mesh>
            <sphereGeometry />
            <meshStandardMaterial map={daymap} bumpMap={bump} bumpScale={0.7} />
      </mesh>
        <mesh>
            <sphereGeometry scale={1.025} />
            <meshStandardMaterial transparent opacity={0.22} map={cloudMap} />
        </mesh>
      <ambientLight intensity={0.5} />
      <pointLight intensity={2} position={[5, 5, 5]} />
//..
Now we can see the clouds.
Next, we'll add a darker background with the color component. We instantiate it like this under pointLight.
//..
      <pointLight intensity={2} position={[5, 5, 5]} />
      <color args={['black']} attach="background" />
//..
With the attach property, we indicate that it will adhere to the Canvas background property as this is the Parent of color.
Now it's time to add the stars, which @react-three/drei makes quite simple. We quickly instantiate the Stars component and some props.
import { Stars, OrbitControls, useTexture } from '@react-three/drei';
//...
<Stars
  radius={100}
  depth={200}
  count={5000}
  factor={6}
  saturation={0}
  color='green'
  fade
  speed={1}
/>;
//...
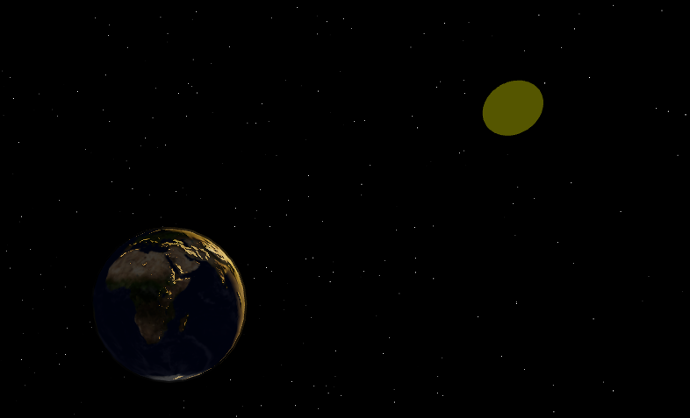
Now we'll add the Sun. For the sun, we'll create a sphere and also, the pointLight we created before will be in the same position as the Sun, so the light comes in that direction. At the same time, we will increase its intensity to 4 as it will be further away and we will add the same color.
//...
{
  /* Sol */
}
<mesh position={[-100, 45, 0]} scale={1.5}>
  <sphereGeometry />
  <meshStandardMaterial color={[1, 1, 0]} />
</mesh>;
{
  /* Luz generada por el Sol */
}
<pointLight intensity={4} position={[-100, 45, 0]} color={'#e5b04d'} />;
//...
In addition, we'll lower the intensity of the ambient light to give a more immersive effect, since the other face of the earth is too bright.
//...
<ambientLight intensity={0.1} />
//...
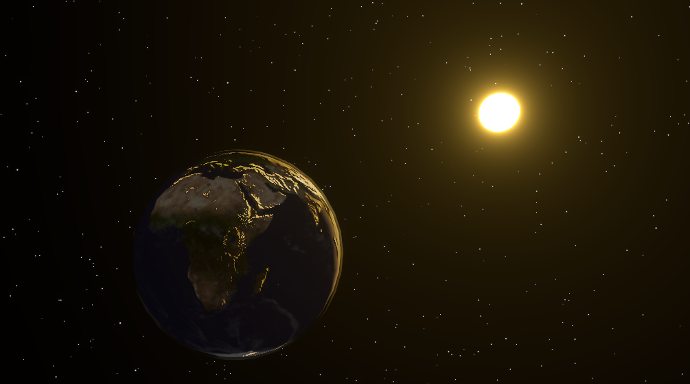
It seems that the Sun is too dim. For the final touch, we'll add a Post-processing effect with a Bloom Layer. This layer generates a "Glow" effect" that will make our scene look much better.
Post-processing effects can significantly affect the performance of an application, and each added layer may be even more demanding on the Hardware.
To add the Bloom, from the library**@react-three/postprocessing** we import the Compositor and the Bloom effect.
In addition, we're going to saturate the colors of the material corresponding to the Sun and add emissive properties so it is affected by the Bloom.
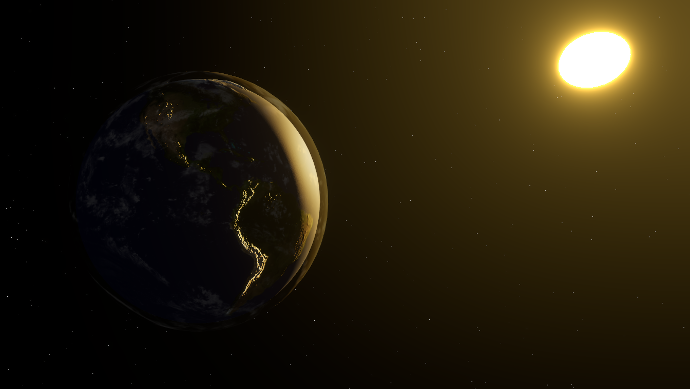
The result is as follows:
..//
      {/* Sol */}
      <mesh position={[-100, 45, 0]} scale={4.5}>
        <sphereGeometry />
        <meshStandardMaterial
          color={[100, 100, 0]}
          emissiveIntensity={100} //Intensidad emisiva
          emissive={'#e5b04d'} //Color de emision
          toneMapped={false} //Mapeo de tono
        />
      </mesh>
    {/* Compositor y capa de Bloom */}
    <EffectComposer>
        <Bloom mipmapBlur intensity={0.1} luminanceThreshold={0} />
    </EffectComposer>
//...
Final result:
And final App code
import { OrbitControls, useTexture, Stars } from '@react-three/drei';
import { Bloom, EffectComposer } from '@react-three/postprocessing';
import React from 'react';
import './App.css';
const App = () => {
  const [daymap, cloudMap, bump] = useTexture([
    'textures/daymap.jpg',
    'textures/cloudmap.jpg',
    'textures/elevation.jpg',
  ]);
  return (
    <>
      {/* Tierra */}
      <mesh>
        <sphereGeometry />
        <meshStandardMaterial map={daymap} bumpMap={bump} bumpScale={0.7} />
      </mesh>
      {/* Nubes */}
      <mesh scale={1.025}>
        <sphereGeometry />
        <meshStandardMaterial transparent opacity={0.22} map={cloudMap} />
      </mesh>
      {/* Estrellas */}
      <Stars
        radius={100}
        depth={200}
        count={5000}
        factor={6}
        saturation={0}
        color='green'
        fade
        speed={1}
      />
      {/* Sol */}
      <mesh position={[-100, 45, 0]} scale={4.5}>
        <sphereGeometry />
        <meshStandardMaterial
          color={[100, 100, 0]}
          emissiveIntensity={100}
          emissive={'#e5b04d'}
          toneMapped={false}
        />
      </mesh>
      {/* Luz generada por el Sol */}
      <pointLight intensity={4} position={[-100, 45, 0]} color={'#e5b04d'} />;{/* Compositor y capa de Bloom */}
      <EffectComposer>
        <Bloom mipmapBlur intensity={0.1} luminanceThreshold={0} />
      </EffectComposer>
      {/* Luz ambiental */}
      <ambientLight intensity={0.1} />
      {/* Controles */}
      <OrbitControls />
      {/* Fondo */}
      <color args={['black']} attach='background' />
    </>
  );
};
export default App;
Github Repository
Deployed Project
Conclusions
In conclusion, technologies like WebGL, Three.js, and React Three Fiber allow developers to create 2D and 3D graphics in the browser in an easier and more modular way. This has led to an increase in interactive 3D websites and online video games. However, it's important to note that working with WebGL can be demanding in terms of hardware resources. Performance optimization ensures a smooth and efficient experience in the browser. Overall, the use of these technologies has led to a more engaging and interactive web experience.
Article Developed By:
Santiago Velasquez
Software Developer at
I.A.S. Engineering, Applications and Solutions S.A.S.